
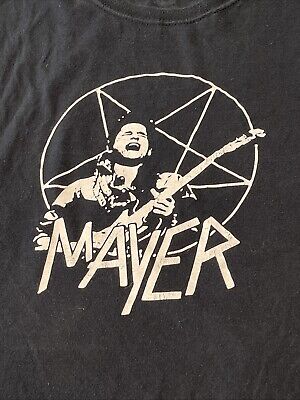
Okay, so I saw this “Mayer Slayer” shirt online and thought, “I gotta have that!” It’s not something you find in stores, so I knew I was in for a little DIY project. Here’s how it went down:
Finding the Right Shirt
First things first, I needed a blank shirt. I didn’t want anything fancy, just a plain, good-quality, crew neck tee. I hit up a local craft store – you know, the kind that sells everything from yarn to fake flowers. I opted for a basic white one because I wanted the design to really pop. Though, thinking back, a light gray or even a pale blue could have worked too.
The Design Dilemma
Next up, the design. I’m no artist, so I needed some help. I looked on the Internet. Basically, I needed the words “Mayer Slayer” in a cool font, maybe with some kind of simple graphic. Easy peasy.
Transfer Time!
Now for the fun part – getting the design onto the shirt. I’ve messed with iron-on transfers before, so I went that route. Printed out my chosen design onto the transfer paper. Important note: Remember to mirror the image before printing! I almost forgot, and that would have been a disaster.
I carefully ironed the design onto the shirt, following the transfer paper instructions to the letter. It took some time and patience, making sure every part of the design got enough heat. I think i pressed down too hard so some details were not good enough. It is good enough for me.
The Final Touches
After letting it cool completely (key step!), I peeled off the backing paper. And… ta-da! My very own “Mayer Slayer” shirt. It’s not perfect, but I’m still pretty stoked with how it turned * felt good to make something myself, ya know?
For washing the t-shirt in the future, I think inside-out and the lowest temperature is the best way to keep the DIY printing in good condition.


